TIG welding is a precise and intricate welding technique that requires an understanding of the different TIG welder settings. If you’re new to TIG welding, the process of selecting the correct settings can be overwhelming.
However, taking the time to learn and experiment with the different parameters can significantly improve the quality of your welds.

In this article, we’ll explain the various TIG welder settings and waveform controls, including amperage, gas flow rate, and more advanced like pulse, AC features, and DC controls. By the end of this article, you’ll have a solid foundation in TIG welder settings and be on your way to producing high-quality TIG welds.
Basic TIG welder Settings
The older transformer machines, but even some cheap newer ones, served as a traditional power source that only has only two basic TIG welder settings: amperage and gas flow rate.
The amperage affects the heat of the arc, which reflects the penetration and ability to fuse metals. As a rule of thumb, you will need one amp per one-thousandth of the inch, and you can use it for metals up to .125″, or simply follow the manufacturer’s recommendations and reference charts on your TIG welder.

Gas flow denotes how much shielding gas you employ in your welds, and it will depend on the actual conditions. GTAW flow rates are typically between 10 and 35 cubic feet per hour, where you use 10 in indoor conditions with no draft or up to 35 CHF when working outside.
However, things today are not so simple, there are a lot of knobs and blinking buttons that will allow you to control nearly all aspects of the TIG welding process. These are the reasons why many professionals choose TIG welding in critical applications where the highest-quality welds are crucial. But most beginners are terrified once they see them, but there is no reason for it. We will explain TIG welding settings in detail, which can help you in your next welding process.
Advanced Inverter TIG Welder Settings
Compared with a traditional TIG power source, a TIG inverter with advanced controls offers increased control over the welding arc that allows the operator to tailor the bead profile, improve arc starting, increase travel speeds, perform better on thinner materials and thinner sections as well as experience other production benefits.
A traditional power source uses a transformer to turn high voltage, low amperage primary power into low voltage, high amperage power required for welding. Therefore, we will explain tig welder settings and waveform controls. An inverter power source, such as the Miller Dynasty 350, takes input power, filters it to DC, and, using fast solid-state switches, increases its frequency to 20,000 to 100,000 Hz.
Then, it transforms the current into useable welding power through an advanced level of control over the arc. Inverter technology provides the capability for high speed pulsing in DC mode. In AC mode, an inverter allows waveform shaping and more control for optimal results in the weld. We’ll take a look at some of the benefits behind these additional capabilities and how they can be used.
TIG Pulsed Welding
TIG pulsing refers to switching from peak amperage to a lower background amperage. This is useful on ferrous metals for which welding heat input must be minimized or for which penetration has to be accurately and repetitively controlled.
For out-of-position welding, pulsing may prevent weld metal from sagging or dropping through. In addition, pulsing allows thin metals to be welded with less distortion.
On thin stainless, a lot of times, you use a pulse just as a way to strengthen the arc. Instead of having the tendency to want to spread out, pulsing focuses the arc.
High speed pulsing also can lead to faster travel speeds. You can cut your welding time in half by switching from a conventional power source to inverter TIG that supports pulsed GTAW.
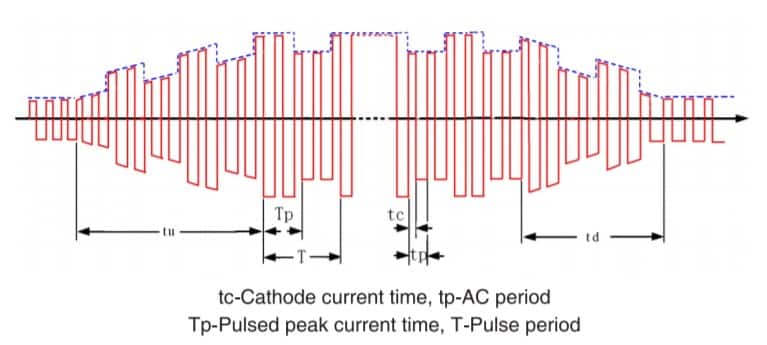
Traditional technology usually allows for 1 pulse per second to 10 pulses per second. Common ranges for inverters are 100 pulses per second to 500 pulses per second. That provides increased penetration, arc stability, and travel speeds.
More advanced inverter power sources, such as the Miller Dynasty 350 and 700, can pulse at 5,000 pulses-per-second, to further enhance stability and to increase travel speed. The increased number of pulses per second also is beneficial in automated applications.
Some inverter power sources allow the user to set the percentage of time at peak and background amperage to control heat input more closely, and to improve the appearance of the weld bead. Increasing the peak-on time increases the puddle fluidity and helps to fine-tune penetration.
A good starting point is to set peak time at 50 percent to 60 percent of each cycle, and adjust the peak time to suit your application.
Some inverters allow you to set the background amperage. This affects heat input into the part, and helps to determine the size of the weld puddle and arc, especially during the background portion of the pulse cycle at low pulses-per-second settings.
At low pulse frequencies, the background amperage should be high enough to keep the puddle from solidifying; it should shrink in diameter but not solidify. For stainless and carbon steel, a good starting point is 20 percent to 30 percent of peak amperage.
AC Output — Welding Aluminum and Magnesium
AC Output Frequency

Conventional technology limits AC frequency to either 50 Hz or 60 Hz, the same as single-phase input power.
Inverter technology allows output frequency to be adjusted from 20 Hz to 400 Hz. Increasing AC frequency provides a more focused arc with improved directional control and a narrower bead and cleaning area. A lower frequency softens the arc and results in a wider weld puddle and bead.
An arc cone at 400 Hz is much tighter and more focused at the exact spot at which the electrode is pointing than an arc cone operating at 60 Hz. The result is significantly improved arc stability and increased penetration, ideal for fillet welds and other fit ups that require deep, precise penetration.
AC Balance Control
AC Balance Control adjusts the balance between penetration (EN) and cleaning action (EP). Inverter-based TIG welders allow the operator to set the amount of EN from 30 percent to 99 percent for greater control and to fine-tune the cleaning action for TIG welding aluminum.
More cleaning action is not necessarily better. To produce a good weld, you need only a 0.1-in. etched zone surrounding the weld, although different joint configurations may have different requirements. Using the least amount of cleaning action necessary — setting the balance at the highest practical EN — helps to maintain the tungsten point, reduces balling and provides deeper and narrower penetration.
Insufficient cleaning action results in a “scummy” weld puddle. If the puddle looks like it has black pepper flakes floating on it, add more cleaning action to “blast” away oxides and other impurities. Too much cleaning action can lead the tungsten tip to ball and will reduce penetration. A good starting point is 75 percent EN, and it can be fine-tuned from there.
Amplitude Control
Independent amplitude control is available only on some inverters. It allows the EN and EP amperage values to be set independently.
Independent control of the EN and EP portions of the AC cycle allows the operator to direct more or less energy into the work piece, and takes heat off the tungsten.
For example, when welding a thick piece of aluminum, the operator can put 250 amps of EN into the work and only 60 amps of EP into the tungsten. This provides faster travel speeds, faster feed of filler rods, deeper penetration, and the potential to eliminate pre-heating. Some companies cut production time by as much as two-thirds using this technology.

Independently increasing EN amperage while maintaining or reducing EP amperage also narrows the arc cone, and lets the operator use a smaller diameter electrode to make narrower welds. This also may allow the use of straight argon shielding gas in place of the standard argon/helium mixture.
TIG Welder Settings And Waveform Controls
Some inverters also bring control over the waveform itself to meet a specific requirement or operator preference. Some of the waveforms include:


- Advanced Squarewave, which gives fast transitions for a responsive, dynamic and focused arc and better directional control.
- Soft Squarewave, which provides a smoother, softer arc with a more fluid puddle than the squarewave.
- Sine wave, which gives the soft-arc feel of a conventional power source, while using square transitions to eliminate the need for continuous high frequency.
- Triangular wave, which combines the effect of peak amperage while reducing overall heat input. The triangular wave also leads to quick puddle formation and, because of lowered heat input, reduced weld distortion, especially on thin material.
Achieving maximum productivity often depends on the inverter’s ability to produce a weld bead profile and characteristics that meet the application needs without over-welding or under-welding, and without requiring excessive post-welding grinding or weld repair. In critical or high-volume applications, only advanced AC controls provide this benefit.
For example, with the Dynasty (an inverter-based AC/DC TIG power source by Miller Electric), you can weld much quicker. And when you strike an arc, it draws a puddle at least twice as fast as conventional TIG.
Many shop owners find that the inverter-based TIG source increases production, provides a quick turn around time per machine, and improves weld bead consistency.
DC Mode TIG Welder Settings Explained
For hobbyists, occasional welders, and even some experts, DC TIG welding takes more than 90% of their entire Gas Tungsten Arc Welding. This TIG welding polarity is an effective way to join a variety of “ferrous metals,” including mild steel & stainless steel, and also copper and chrome moly. Due to better control, precision welds, and minimal distortion, DC TIG welding works great with stainless steel.
Tungsten Inert Gas Welding (TIG) with DC output utilizes electricity that passes through the tungsten electrode. This means that the current flows in one direction only, from the positive (+) terminal of the power source to the negative (-) terminal.
DC GTAW welding can be done on two polarities, DC positive and negative. To switch your TIG welder settings, you will have to switch the places of your TIG torch and clamp. If your torch is connected to the negative side of the terminal, you get Direct Current Electrode negative (DCEN) polarity, and if it is connected to the positive side, you get Direct Current Electrode Positive (DCEP) polarity.

Direct Current Electrode Negative Settings
In DCEN polarity, the TIG torch is connected to the negative side of the terminal. Unlike Stick welding, 33% of the heat is concentrated on the tungsten electrode, while 67% is on the positive side of the arc (TIG weld). As a result, you get deep penetration and stable arc when TIG welding steel. Reliable heat input provides proper fusion, good weld strength, less risk of weld defects and produces less spatter.
However, high heat input and penetration don’t work well with thin materials, so you should handle DCEN with care. Additionally, there is no cleaning action present, so you should really use DC negative when welding aluminium. Nonetheless, since the heat is concentrated onto the TIG welded piece, you can use smaller diameter tungsten, and tungsten consumption is lower, and you can use an air-cooled torch.
With its good sides, welders tend to use DCEN polarity as an effective way to weld ferrous metals that require good heat input, such as mild steel & stainless steel, and also copper and chrome moly.
Direct Current Electrode Positive Settings
In DCEP polarity, TIG torches are connected to the positive side of the terminal. Therefore, approximately 33% of the heat is concentrated on the TIG weld, while 67% of the heat input is focused on the tungsten electrode. As a result, you don’t get the highest penetration like with MIG welding or Stick welding, and electrode such as pure tungsten is exposed to higher wear and consumption. DCEP welding is not always the first choice of many welders, but it has its set of unique advantages.
Most importantly, as the electrons flow toward the electrode, they create cleaning action on the surface. As a result, the surface oxides are evaporated, so you can create desirable welds on materials such as aluminum. Even though it is possible, many will recommend AC TIG welding polarity for aluminum. However, increasing the heat into the electrode allows for higher filler rod distribution. Melting your filler metal faster allows for higher welding speed, but you should be aware of the issues such as arc blow.
Since DCEP TIG welding has various drawbacks, welders usually turn to AC balance when welding delicate metals such as aluminum or magnesium. With it, you get both DC positive and negative, and you can balance the arc cone distribution.
Controlling the TIG Welding Process
Advanced TIG welding machines can look pretty terrifying to absolute beginners with all those flashing lights and controls. Even though setting your welder might seem like operating a spaceship, once you get the hang of the controls, you can control your TIG welding process from start to end. Besides the pulse cycle, sine wave, and AC balance controls we talked about in the previous section, we will discuss heat management.
Excellent heat control and distribution is why professional welders or welding engineers even choose TIG welding in the first place. To control your welding process, you will need to look for TIG welder settings such as starting amps, pre-flow, ramp up (upslope), max amps, ramp down (downslope), end amps, and post flow.
2T/4T Mode
The way the entire welding process occurs can be controlled by a torch trigger by selecting a 2T or 4T mode. The T stands for touches, so depending on the settings, you will need two or four touches to start and complete the weld.
2T in TIG welding is pretty straightforward. You press and hold the torch trigger, and the machine reaches the selected amperage. The arc is present as long as you hold the trigger. Once you release it, the arc slowly shuts down. This is a simple method that is excellent for beginners, and it is often used on shorter welds.
4T in TIG welding is a bit different and more complex. As the name states, you will need four touches of your torch to start and complete the weld, and it is closely related to the settings we talked about above. In this mode, the welding starts by pressing and holding the trigger, and that’s when pre-flow and starting amps kick in.
Once you release the trigger, your TIG welder employs the upslope time and gradually reaches the maximum amps, and you start moving the torch and welding without needing to hold the trigger. When you need to finish the weld, you’ll need to press and hold the trigger again. Once you press it, the downslope commences, and the TIG welder reaches the end amps. Once you release the trigger, the arc extinguishes, and post flow cooling begins.

Starting Amps
Welding delicate and thin metals can be a nightmare since even the slightest mistakes or more heat can cause defects. TIG welding machines deal with potential issues with pulse, but before you begin welding, you can also set the starting amps.
Setting the starting amps can be crucial on specific metals that require a bit more heat, such as stainless steel, but sudden bursts of heat can cause burn through. In that case, you can select low starting amps that are just enough to keep the arc going but with the controlled heat that won’t burn through metal.
Additionally, when cleanliness is crucial, you can select pre gas flow. Once you turn it on, pure argon gas starts flowing before the welding commences, making sure your weld is protected before the weld pool forms.
Upslope (Ramp Up Amperage)
After the starting amps, you can select the ramp up or upslope feature. It is used in the same conditions if you don’t want to reach max amps straight away. Once this TIG welder setting is on, the welder will gradually reach the maximum set amperage, starting from the start amps.
Once again, this is quite useful TIG setting when welding dissimilar metals or metals that don’t like bursts of heat immediately. As the heat increases, the metal is ready to accept filler wire, and there is low heat stress on it, which is crucial if you want the strongest TIG weld.
Downslope (Ramp Down)
We won’t talk too much about max amps, as they are the amperage you actually set according to the metal thickness or manufacturers chart. Setting the max amps is pretty straightforward and one of the essential TIG welder settings. However, when TIG welding specific metals such as copper or cast iron, you’ll have to deal with another thermal issue. If they lose the heat immediately after the welding, they are subjected to thermal stress, so cracks appear.
To deal with it, you can set the downslope or ramp down amperage, which is similar yet opposite to ramp up. As you finish the weld, the amperage gradually drops to end amps, allowing the weld to drop the heat gradually rather than suddenly. That way, you make sure there are no thermal cracks in delicate metals. In addition, you can do all this with your foot pedal control, but the machine can do it for you.
Post Flow
The weld pool of the metals, such as stainless steel, can be exposed to contamination even when you finish the weld. To deal with the post weld contamination, you can employ post gas flow. This setting allows shielding gas to run for several seconds after you finish the weld, just so you can be sure everything is well protected.
In addition, post flow cools down your torch after the weld, so you can use it to increase the lifespan of consumables. However, you spend some extra shielding gas which doesn’t have to be so cheap, but the additional costs can be well worth it nowadays.
TIG Arc Start Methods
On top of everything you’ve read today, your TIG welder can have three different arc starting methods: scratch start, lift TIG start, and high-frequency start, and you can usually find them as part of your TIG welder settings. Let’s see how each is initiated and when to use them.
Scratch Start TIG Start
The scratch start is one of the oldest arc starting methods, and it is slowly getting out of service today. To initiate an arc, you will have to scratch the workpiece with your tungsten, like lighting a match, hence the name scratch start. Fundamentally, this reminds me of stick welding, where you have to touch the surface to initiate an arc, but it carries a list of drawbacks.

Firstly, it takes time and effort to get the perfect start. That’s what made many beginners quit TIG welding, and even some seasoned welders struggle to get a reliable start each time. In addition, touching the base metal can contaminate the tungsten electrode, so you have to cut it and resharpen each time, which makes a non-consumable electrode actually consumable. Touching the base piece can also leave traces of tungsten in the weld pool, causing defects such as tungsten inclusions, which interfere with weld integrity.
That’s why today, a scratch start is rare and usually found in the cheapest TIG/Stick welding machines. It is replaced by a much more advanced lift arc TIG and HF start.
Lift Arc TIG Start
Lift TIG is now part of most budget TIG welders, and it is a significantly more straightforward method. To initiate it, you slightly touch the piece with a tungsten tip, and then you slightly lift it, hence the name Lift TIG. The machine senses the differences and initiates the arc.
As a result, this is a much simpler and cleaner method than a scratch start, as the risk of contamination is minimal.

However, there is that one slight moment where you have to touch the base piece to start an arc, so it cannot be described as a non-contact start method.
High-Frequency TIG Start
High-frequency is the most advanced and clean arc start process that is widely used when weld cleanliness is crucial. To initiate it, you put your tungsten near the base metal, and the electrical current passes from the welding machine to the tungsten electrode at a high frequency of around 200 kHz.
As a result, you don’t have to touch the base metal so there is no risk of contamination. In addition, this is pretty easy to perform, as you don’t need any special movement. That’s why HF start became the best TIG arc start method, and the equipment needed to perform it is much cheaper now, so you even find it at budget TIG welding machines.

This method has only one drawback, and that’s the electrical noise. The high frequency used to initiate an arc can interfere with electronically sensitive devices such as computers, laptops, phones or CNC tables. That’s why you will need to switch to Lift TIG when welding in these conditions.
Conclusion
Understanding TIG welder settings is essential for producing high-quality welds. While TIG welding can be a challenging technique to master, knowing the right settings for your welding project can help you achieve the desired results.
The key parameters to consider when setting up your TIG welder include the amperage, gas flow rate, electrode type and size, and tungsten type and size. By making adjustments to these settings, you can optimize the welding process for different materials and thicknesses.
Additionally, it’s important to keep in mind that different welders and welding machines may have slightly different settings and preferences. As a result, it’s crucial to practice and experiment with different TIG welder settings to find what works best for your specific welding needs.